RedSn0w is the cross platform jailbreaking tool that has been around since the release of the iPod Touch 2nd Gen. It was the first jailbreaking tool to jailbreak the newer iPod Touch and iPhone models, which at the time was the iPhone 3g and the 2nd gen iPod Touch. RedSn0w has been praised the most stable and error free jailbreaking program around and for the longest time it was one of the only jailbreaking tools available to windows users. However this all changed when we saw the release of the 3x firmware generation. RedSn0w supported up to the 3.0/3.01 firmware and then lost support for anything above the 3.0 firmware. In order to jailbreak the 3.1/3.1.2 firmware windows users were left with the choice of using blackra1n or keeping their 3.0 jailbreak. Now however the creators have updated redsn0w to allow it to jailbreak the 3.1.2 firmware and it provides some cool new features. In this tutorial you will learn how to use redsn0w to jailbreak your iPod Touch/iPhone while running the 3.1/3.1.2 firmware.
**Note Late models of iPhone 3GS, iPod touch 2G and iPod touch 3G are all restricted to “tethered” rebooting. That means you need to connect your device to a computer to complete the boot after a reset. Also, these devices cannot have custom boot/recovery logos.
Step 1) – The first thing you are going to need to do is download RedSn0w 0.9.2 to your desktop. Click one of the download links below that designates to the operating system you are currently running.
Download RedSn0w for Windows or Mac
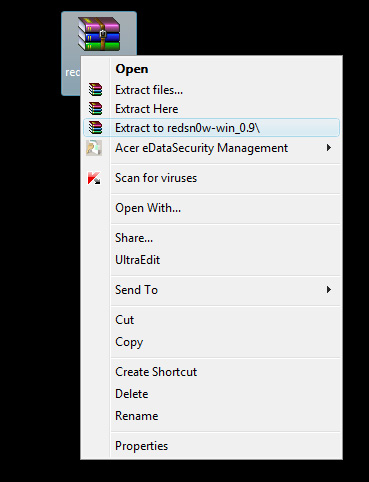
Step 2) – Now that RedSn0w is downloaded to your desktop you are going to need to extract it. Right click on the redsn0w0.9.zip file and hit the extract button now. ..
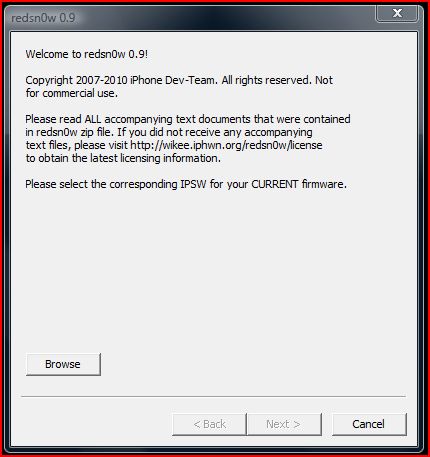
Step3) – Once RedSn0w is extracted to your desktop you can navigate to the RedSn0w folder and double click the RedSn0w.exe to start the program. Once RedSn0w is up and running the first thing you are going to need to do is located your current firmware file.
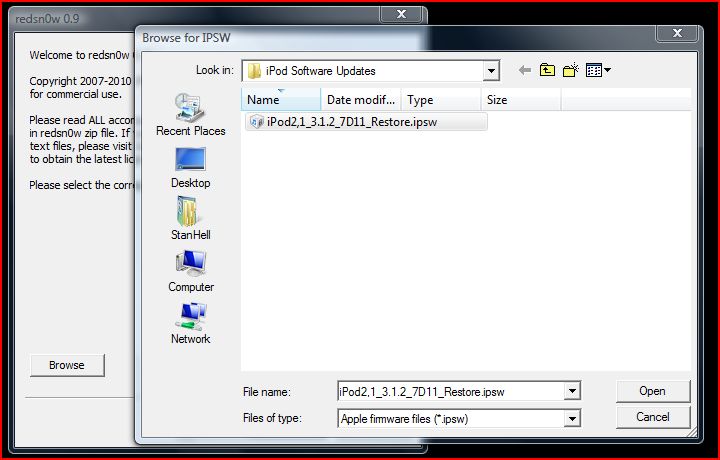
If you do not have your current firmware file downloaded then you can go to the downloads section on this website and download your firmware file. If you have your firmware file downloaded but cant locate it then follow the directory structure below and you will find it there. Once you have located your firmware file click the browse button and double click the firmware file. RedSn0w will now process the firmware file…
Windows Vista: C:\Users\<User>\AppData\Roaming\Apple Computer\iTunes\iPod Software Updates
Windows Xp: C:\Documents and Settings\<User>\Application Data\Apple Computer\iTunes\iPod Software Updates
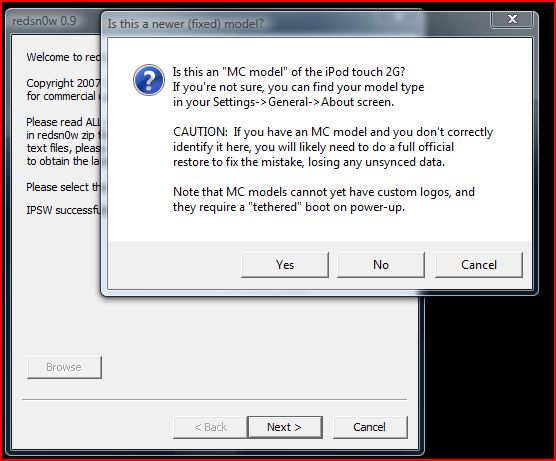
Step 4) – Once your firmware file has been processed you will get a warning message. This message will ask you if you have an MC model of the iPod Touch or if you are jailbreaking the iPhone it will ask you if you are jailbreaking the latest iPhone 3gs. Click either yes or no depending on what apple device you are jailbreaking. If you are not sure what model of the iPod Touch or iPhone you are jailbreaking then go into settings > General > About on your iPod Touch/iPhone. Once you are in About page scroll down till you see a box that says serial number and if it begins with MC Then you have the newer iPod Touch or iPhone.
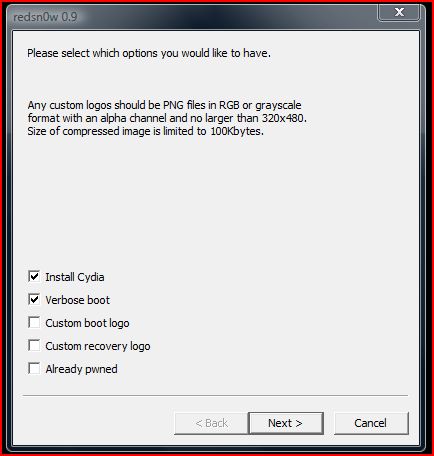
Step 5) – Once you select either yes or no click the next button and you will be brought to the next page. In This page you have several options to customize your jailbreak. If you wish to enable any of these options just click the box beside them and they will be included in your jailbreak.
- Install Cydia – Always make sure this box is checked. Cydia is the default installer for 3rd party applications. Through Cydia you will get access to applications like Winterboard, Pro Switcher, Categories and much much more!
- Verbose Mode – If you enable this mode then instead of showing the default apple logo on boot up your iPhone or iPod Touch will show whats really happening behind the Apple logo in lines of commands. **Note The newer iPhone 3gs and iPod Touch 2g/3g models are not compatible with Verbose mode at this point. Wanna see what this looks like? Click Here
- Custom Boot/Recovery Logos – If you enable this mode then you will be able to choose a custom image to show instead of the defualt Apple logo upon boot up and entry into recovery mode. Simply click the box beside the two options and you will simply have to locate your image and then RedSn0w will handle the rest. If you are looking for a place to find custom boot/recovery logos simply search boot logos into google and you will find some. **Note The newer iPhone 3gs and iPod Touch 2g/3g models are not compatible with custom boot/recovery logos at this point.
- Already Pwned – Only select this option if you have already jailbroken your iPod Touch or iPhone with RedSn0w/Blackrain and your jailbreak is tethered. If you select this mode RedSn0w will simply boot your iPod Touch or iPhone to its working state.
- Fake Carrier Bundles – This option is for iPhone’s only it allows you to install cellphone Carrier Bundles that aren’t officially signed by Apple. This lets you, for instance, install a Carrier Bundle that allows you to use your i Phone as a way to connect your PC to the internet (through your 3G cell connection).**Note The newer iPhone 3gs are not compatible with Fake Carrier Bundles at this point.
Once you are happy with your selected options you can click the next button to continue to the next page.
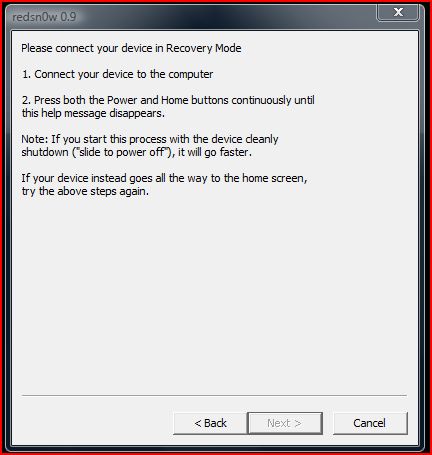
Step 6) – Now that you have selected your features that you wish to have included in your jailbreak the next step is to plug your iPod Touch or iPhone into your computer and then put your iPod Touch or iPhone into Recovery Mode (Yes Recovery Mode…. Not DFU Mode). To do this simply turn your iPod Touch or iPhone off and then hold the power and home button together until you see the apple logo. Once you see the apple logo then take your finger off the power button and continue holding the home button till RedSn0w recognizes your iPod Touch/iPhone.
Once RedSn0w recognizes your iPod Touch or iPhone it will upload everything to your iPod Touch/iPhone and begin jailbreaking it. Allow up to 5-10 mintues for the jailbreak to successfully complete. When you see the finish screen come up you can click the finish button and RedSn0w will exit. If you have a tethered jailbreak (Which is the newer models of the iPod Touch/iPhone) then you will need to simply open up RedSn0w again and click the already pwned box and then redsn0w will boot up your iPod Touch or iPhone back to a working state. If you require any help with this tutorial or have any questions/comments go to the Graveyard and I will be more than willing to help you out. You can also leave any questions/comments in the comments section and I will reply.
Thanks cheap carta r4i I really appreciate all the comments you are giving my blog! It is always motivational to here comments like these it inspires me to write more Thank you very much! :)
I have a iPod 2G MC model and I’m using redsn0w 0.9.6b1 on Windows Vista.It all works great except it freezes on the “waiting to reboot” process.What should i do?
Will this work with a iPhone 4 with iOS 4.0.2?