The iPod Touch, iPhone and iPad make for great portable hacking devices, because to the naked eye they look nothing more than an ordinary Apple product. To an experienced eye however, this of course is a deceiving statement as when you jailbreak your idevice there are numerous hacking programs at your disposal. You see programs such as Pirni-Pro, Metasploit and Nmap make the iPod Touch, iPhone and iPad one superb hacking device. While there are many hacking tools for your iDevice, in this tutorial you are going to learn how to use a newer hacking application called Pirni Pro!

What Is Pirni Pro?
In computer literate terms, Pirni Pro is basically a GUI to a Man in the Middle Attack that you can carry out on your iDevice. Man In the Middle Attack? Yes, on a network all of the traffic follows a pattern. You request a website on a device (whether it be a computer, phone, tablet etc…) and the signal is sent from your device, to the router and is sent back from the router to your device to load a specific internet page. What happens in a man in a middle attack is your iDevice, becomes the middle man in this request pattern. In other words your iDevice acts as an invisible 3rd party router that is only in place to record this network traffic. Take a look at the graph below for a better understanding…
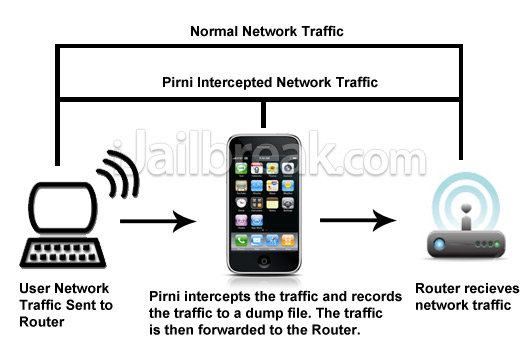
Now that you have a better understanding of how Pirni Pro actually works, lets dive into learning some more about Pirni Pro. Pirni Pro steps up the original command line version of Pirni by adding a useful GUI to make things a lot easier for the end user. Pirni Pro also provides automatic fetching of your Router and Source IP address, meaning that if your connected to a network all you need to do is click the start button to begin collecting packets (script kiddie alert).
Pirni Pro even provides one more useful feature called Regex (meaning regular expressions), Regex is a powerful way for Pirni to Parse for data using the packets it collects while sniffing. You can see the big difference between Pirni and Pirni pro in the graph below…
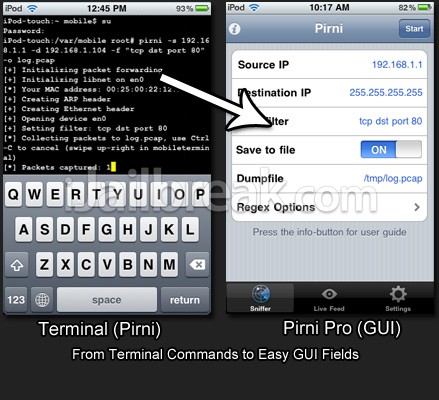
As you can clearly see there is a big difference between the original Pirni which used Terminal compared to this new version of Pirni called Pirni Pro. If you are still not sure what it is Pirni actually does, then I will give a brief explanation quoted from my original tutorial below…
Pirni is an application that was ported to The Ipod Touch/iPhone to be used as a native network sniffer. Pirni is so useful because it gets past the iPod Touch’s/iPhone’s wifi hardware limitation of not being able to be set into promiscuous mode (a mode that allows a network device to intercept and read each network packet that arrives in its entirety). To get past this limitation Pirni comes with an ARP spoofer that successfully routes all the network traffic through your iPod Touch/iPhone, records it to a dump file and then uses packet forwarding to send it to it’s normal recipient (ie. the router). What this basically means in simpler terms is that all the traffic on a specific network comes through your iPod Touch/iPhone before it reaches the router. This meaning that if we sniff the network long enough, another user connected to the network could enter in an unencrypted password and you could then retrieve that password after looking through your dump file.
In short Pirni Pro is basically an application that can intercept network traffic and parse through collected packets to display sensitive information in the live feed. In this tutorial you will learn how to setup and install Pirni Pro, scan for such sensitive information and learn some advanced functions like adding your own regex.
As I have stated above this tutorial assumes that you have read over my last post or that you at least have some general knowledge of networking. If you haven’t read it I recommend you at least look over it quickly because I am not going to go into as much detail on subjects like analyzing packets, shshing and general networking terms.
Learning How To Use Pirni Pro
Step 1) The first thing you are going to need to do is install Pirni Pro to your iPod Touch or iPhone (Pirni Pro is not yet available for the iPad, but will be ported soon). Pirni Pro is in fact a commercial application, meaning you will have to buy it for $1.99. To do this simply search for Pirni Pro via Cydia and click the Buy Now button in the top right hand corner of the screen.
If you have never bought an application through Cydia, the process is very simple and secure. Simply validate your ID with a Gmail Account (other validation methods available) and then purchase your app through Paypal. Once you have purchased the application, you can install it through Cydia like any other app.
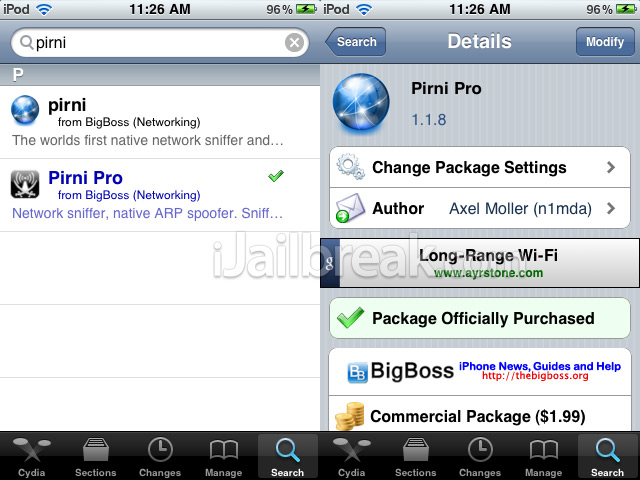
Once you have purchase the app and installed it to your iPod Touch or iPhone you are ready to begin.
Step 2) When you have completed step one you will need to find Pirni Pro on your SpringBoard. When you see Pirni Pro on your SpringBoard click the Pirni Pro icon to launch the application.
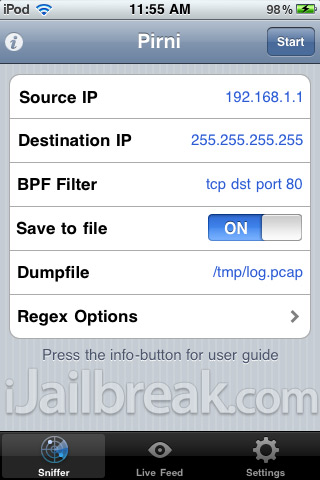
When Pirni Pro has successfully launched you will be presented with a 3 tabbed interface. Pirni Pro has an extremely clean and easy to use interface compared to that of the original Pirni; which didn’t even feature a GUI (graphical user interface). The first tab which should currently be active is the Sniffer tab, followed by the Live Feed and Settings tab. To use Pirni Pro you will need to be connected to a WiFi network. Before you continue make sure that you connect your iPod Touch or iPhone to a WiFi network of your choice.When you are connected to a network you can begin sniffing for packets.
Step 3) When you are connected to your WiFi network the information in the Sniffer tab should be automatically filled in for you. However I am going to go into detail about what each of the followings fields actually mean.
- Source IP: The Source IP Address is the IP Address that you want to Spoof; usually this will be the router IP Address as you want to intercept packets coming to and from the router.
- Destination IP: This is the address that you want to receive packets from, generally this will be left as 255.255.255.255 as this corresponds to the entire network. However if you want to focus packet collection to a specific device on the network, Enter this IP address here instead.
- BPF Filter: A Berkly Packet Filter is applied to filter out useless packets coming to and from the network. Generally you will leave this as is, however in some cases you may want to target specific packets and to do this you use a BPF filter, which will be explained in more detail later on in the tutorial.
- Save To File: This setting will toggle whether or not you want to save the packets you collect to a log file. Usually this is recommended because you can then later analyze your dump file to find information that may have been missed by Pirni Pro.
- Dump File: If you choose the save the packets you collect, you can change the dump file name to whatever you wish. You can also change your dump files output directory.
- Regex Options: This option is used to select which regex you want to enable for this specific scan. Regex are regular expressions used to parse data for certain contents such as passwords, usernames etc. Again this will be explained in more detail later on in the tutorial.
Now that you are familiar with Pirni Pro’s main options, you are ready to carry out your first simple scan. Make sure all the options are filled in correctly to generally match the screenshot below and click the start button (Your Source IP Address will be different from what is depicted below).
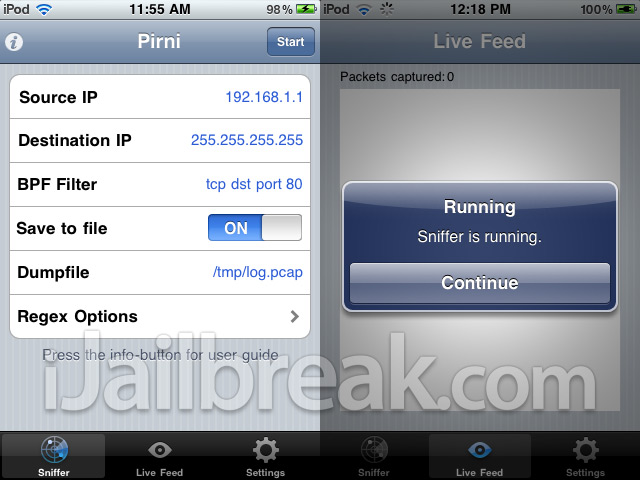
When your scan starts you will be taken to the Live Feed tab. This is the tab where any passwords or sensitive information will be displayed. Now if you are running this scan on your home network you will probably not see any information here. To see results displayed you will need to browse a website that isn’t encrypted with SSL (meaning big websites like Facebook, Hotmail, Gmail and Yahoo will not work).
An example of a website that is not encrypted with SSL would be Netlog.com, if you make an account and log in while scanning you should see results come up in the Live Feed. As I said before, results will be dismal on your own network as you are the only one connected to it. For optimal results you will need to go to a public network, however before you do you will need to learn some advanced functions of Pirni Pro.
Getting Advanced With Pirni Pro
Now a lot of confusion with Pirni Pro is with its new Regex options. A lot of users are confused with how regex work and where to go for more regex strings. In this section of the tutorial I hope to clear a lot of confusion up on Regex…
What is Regex?
Regex, which is actually short for Regular Expressions; is a very powerful way to parse for specific data. When Pirni collects packets it stores them to a dump file, these stored packets are then parsed using Regex to display sensitive or useful information in the live feed. Regex is a great feature in Pirni Pro because you as the user can specify what kind of data you are looking for in a specific scan.
Where is Regex Displayed in Pirni Pro?
All current Regex strings are displayed in the settings tab. A Regex string is the actual expression that Pirni uses to parse through data. Through the settings tab you can edit current regex, add new regex and browse available regex. When you first install Pirni Pro on your iPod Touch or iPhone, by default Pirni Pro will include 3 Regex strings for – Vbulletin, PhpBB and generic password/username credentials. This means that Pirni Pro will scan any packets it collects for those type of credentials and nothing more, unless you add more yourself.
Where can I find more Regex?
You can find a variety of pre-developed Regex strings at a website called Regexlib.com. This website contains a lot of pre written Regex strings which are compatible with Pirni Pro. If you search for passwords in the search pane in Regexlib.com, you will be returned with Regex strings meant to find passwords for a variety of websites. Alternatively you can learn to write your own Regex strings.
Now that we have covered a lot of ground on Regex, you are going to learn how to add more Regex strings to Pirni Pro. To add a Regex String to Pirni Pro you are going to need to go into the settings tab. Once you are inside the settings tab you should see three Regex that are added by Pirni Pro by default. In order to add your own Regex you are going to need to click the + Button in the top right hand corner of the screen.
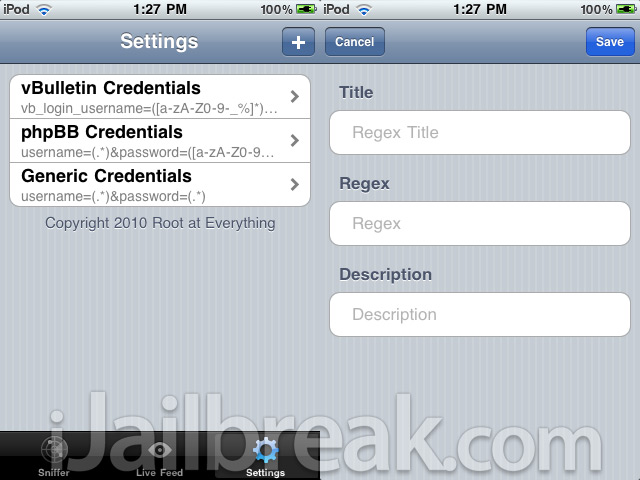
Once you have clicked the + button you will be presented with three fields – Title, Regex and Description. For this Regex you will be adding the ability for Pirni Pro to find an email addresses. Enter the following information presented to you below into the input fields shown: (when you are entering the actual regex string, copy and paste it via your iPod Touch/iPhone to avoid errors)
Title: Email Address
Regex: \b[A-Z0-9._%-]+@[A-Z0-9.-]+\.[A-Z]{2,4}\b
Description: Regex to grab email address’s
When you enter in the above information and press the save button you should see the regex you just entered saved in your settings tab.
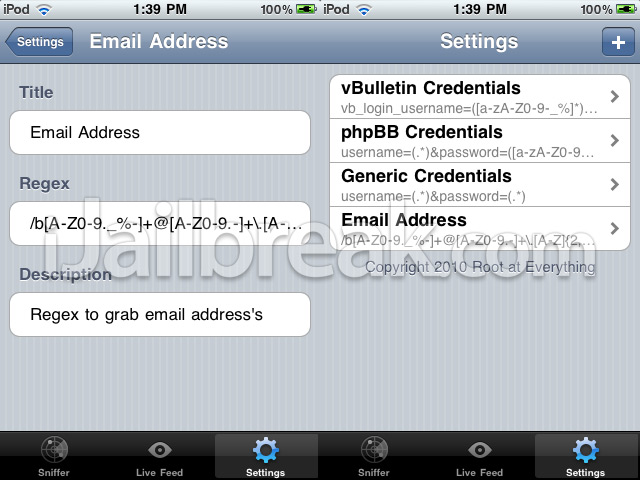
As you can see adding different regex to Pirni is a simple way to give Pirni Pro a better chance at displaying information in the live feed. As Regex are an essential and needed part of Pirni Pro I will list a few more Regex that you should add to extend Pirni’s live feed functionality. One thing that you need to realize however is that Pirni Pro is not capable of intercepting packets from Facebook, Gmail, Yahoo etc.. The reason for this is because those websites are encrypted with SSL (meaning all sensitive information is encrypted). An SSL stripper will hopefully soon be implemented in Pirni Pro to combat just this.
Pirni Pro Regex String List:
Title: General SQL Queries
Regex: (SELECT\s[\w\*\)\(\,\s]+\sFROM\s[\w]+)| (UPDATE\s[\w]+\sSET\s[\w\,\’\=]+)| (INSERT\sINTO\s[\d\w]+[\s\w\d\)\(\,]*\sVALUES\s\([\d\w\’\,\)]+)| (DELETE\sFROM\s[\d\w\’\=]+)
Description: This will match the following SQL Queries (SELECT, UPDATE, INSERT and DELETE)
Title: Website URLs
Regex: (http://|)(www\.)?([^\.]+)\.(\w{2}|(com|net|org|edu|int|mil|gov|arpa|biz|aero|name|coop|info|pro|museum))$
Description: This will find websites that users are viewing
Title: Credit Card Number Capture
Regex: ^(?:4[0-9]{12}(?:[0-9]{3})?|5[1-5][0-9]{14}|6011[0-9]{12}|3(?:0[0-5]|[68][0-9])[0-9]{11}|3[47][0-9]{13})$
Description: This Regex can actually be used to capture credit card numbers.
Title: Social Security Number Capture
Regex: ^\d{3}-\d{2}-\d{4}$
Description: This Regex can be used to capture hyphen-separated social security numbers
Title: Phone Number Capture
Regex: ^(\(?\+?[0-9]*\)?)?[0-9_\- \(\)]*$
Description: This Regex can be used display any Phone Numbers that are Captured
The above Regex Strings that I listed are a bunch of really useful strings, that I suggest you take the time to add to Pirni, as it will extend its live feed functionality. If you find anymore you can add them into Pirni Pro yourself. As I said before a great place to find more regex is Regexlib.com! Now that you are more familiar with Pirni Pro’s regex functionality, you can move on to the last small part of this tutorial which is about Berkly Packet Filters.
Learning A Little More On Berkly Packet Filters
Near the beginning of the tutorial I explained what a Berkly Packet Filter was (BPF for short). A BPF filter is a filter used to filter out unnecessary packets that would not be useful to you. By default the BPF filter tcp dst port 80 (which is entered by default) will suffice because it captures all outgoing http packets. Sometimes, however you may want to specify certain packets or certain ports to intercept from. Please keep in mind that Berkly Packet Filters is such a large topic that it could in fact be a separate tutorial, I am only going to go into small detail on this subject.
If you are interested in learning more about BPF Filters or about how BPF Filters work you can read the following articles:
- http://biot.com/capstats/bpf.html
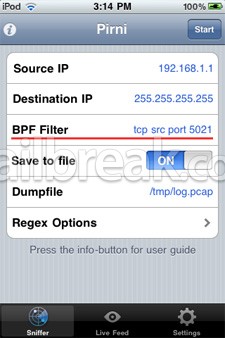
Now if you are interested for example only capturing packets from a specific port, then you would enter in the following BPF filter into the BPF Filter field in the sniffer tab. (Replace the ports in red with the port of your choice)
tcp src port 5021
If you wanted to apply a BPF filter to a port range you would enter the following BPF filter. (Replace the ports in red with the port of your choice)
tcp src portrange 5021-6000
The last TCP port I will go over is if you were interested in collecting FTP data. If you are interested in only collecting this type of data enter the BPF filter below.
gateway snup and (port ftp or ftp-data)
Again if you are interested on more information about BPF filters then check out the two references I listed above.
Final Conclusion
Now that you have learned how to use Pirni Pro to scan for packets, add additional Regex functionality and apply a variety of BPF filters you are ready to fully use Pirni Pro to the best of its ability. Pirni Pro is a great new addition to the Pirni family and allows for easy packet collection all behind a great new GUI. Always make sure when you are done scanning for packets that you later analyze your dump file using wireshark or any other packet analyzer. Your Dump file will be saved to the following directory by default:
/var/tmp/log.pcap
To access this file, log into ssh and go into the directory shown above. You should see a file name log.pcap, drag this to your desktop and you can further analyze it using a packet analyzer program like Wireshark. If you need assistance using this program then refer to my first Pirni tutorial.
I recommend that you always analyze your dump file after it is collected because there could be some useful information Pirni Pro never displayed on the live feed. Please let me know if you have any questions or comments, if you managed to finish reading this long tutorial the least I can do is answer your questions…
Update #1: Expanding Your Knowledge Of Network Hacking With Pirni-Derv [Tutorial]
Hello Rip,
it should be on Cydia by default on the BigBoss repo. Do you still not see it?
Why dose nothing show up in the live feed for me? I have enabled the website URLs regex that i have copy and pasted and checked for errors but i still dont see anything in my live feed. Please help.
Well iv downloaded pirni pro on my 4.2.6 iphone. it opens, but when i start it right off the bat, it says that it cant find mac id. also when i downloaded it, it didnt come with any regex
I tried locating the regex, by searching vbulletin etc, but it is not in the libraries… anybody no where to find the regexes or downloaded it on 4.2.6?
you cant use it on ssl web sites, dont bother.
Hey Jaden, is anyhow that we can use the extension of pirni, .derv, with pirni pro?!?!
i need some help whit this program prini pro, If ur good at it and have time to support me send a email to me
Email adress: Simon_demir@hotmail.com
thanxz !
Great article. Could anyone build a regex to capture POP credentials (after USER and PASS) on port 110?
I just love it :)
different colors for the regex would be good anyway…:D
did you build it yet? i very interest in a regex for pop credentials
can i do this on nokia n900 phone
i want to fine out if i can use
Pirni Pro on my nokia n900 phone
Where can i get more regex?!
Why it doesent show anything in the live feed ? I got the URL regex but still doesent working. Even the support mail isnt working
user=(.*)&pass=(.*)&
After I press “START” my Live Feed stays blank. What Am I doing wrong?
Are you on a public network? If so I’ve heard that some public networks such as hotel wifi’s tend to be secured. I tried one myself and it didn’t work …